
How to Launch Your Own Website — Step-by-Step Beginner's Guide
So… you want to launch your own website? That’s great! Every single million-dollar company on this planet has an online presence. If you’re looking to join their ranks, it’s time to get you up to speed. Building a website can be difficult, but this step-by-step guide will take you from start to finish and have you online within a few hours no matter what your skill level is or how much experience you have in web design.
Step #1: Choose Your Content Management System (CMS)
In the past, web designers needed to know how to code. Not anymore! Building a website no longer requires extensive coding knowledge. Modern-age web design has been simplified through the development of Content Management Systems. A Content Management System is a type of software used to manage the creation and modification of digital content. The most popular Content Management System—by far—is WordPress.

Provided by our friends over at BuiltWith.
As you can see, nearly half of the websites on the internet were made with WordPress.
Reasons to use WordPress
1. It’s POPULAR
Due to the popularity of WordPress, you don’t ever have to worry about your website disappearing one day because it’s outdated or obsolete. WordPress is constantly updated to improve functionality and reduce security risk. Given that WordPress runs nearly half of all websites, it would be an absolute catastrophe if anything were to happen to it. With that being said, it’s your safest choice when choosing a Content Management System. WordPress isn’t going anywhere. It’s highly unlikely anything is going to keep WordPress from being ranked #1 as the most popular Content Management System.
2. It’s FREE
WordPress is an open-source software and is completely free to download, install, and use for everyone. It doesn’t cost a penny. WordPress was built by web developers for web developers. With that in mind, there’s a large community of web developers online that provide various themes and features that you can download and install onto your WordPress website. Beyond that, due to it’s popularity there are plenty of experts online that provide free assistance and information for you to help build your WordPress site. The only things you’ll need to purchase to access WordPress and bring your website online are a domain name and web hosting.
3. It’s EASY
WordPress is highly customizable and user-friendly. When working with WordPress, you are given a dashboard where you have several different options and features to assist you in managing your site. Among these features, you are given the ability to download “plugins.” Plugin’s are essentially applications that perform a specific task on your website, similar to an app on your phone. There are over 55,000 WordPress plugins available to install on your website. There are even website builders offered as plugins which improve functionality by providing the ability to simply drag-and-drop text boxes, images, headings, buttons, charts, and various other features wherever you want on your website.
The conclusion: Build your website with WordPress.
Step #2: Find a Host
If you want to start a website, you’ll have to find a hosting provider.
What is a hosting provider?
A hosting provider is a company that provides storage space and connectivity to the internet so that businesses and individuals can make their websites available through the World Wide Web.
Managed Hosting vs Unmanaged Hosting
Not all hosting companies are the same. Some hosting companies take a hands-off approach while others are more hands-on; the more hands-on approach being managed hosting versus the more hands-off approach being unmanaged hosting.
Unmanaged hosting is when a provider offers a plan with very few additional services—if any. This means you’ll need to install any necessary software on your own (WordPress, Apache, PHP, etc.) and provide your own services such as security.
If you’re not an expert and don’t have the equipment or the know-how to do these things, I would recommend finding a managed WordPress hosting solution.
Hosting providers with managed WordPress hosting offer various other services in addition to server space and web-connectivity.
What services do managed WordPress hosting solutions provide exactly?
• Automated backups
• Automatic software updates
• Security (malware scanning and removal)
• Performance monitoring
• An easy-to-use hosting control panel
• One-click WordPress installation
• SSH access
• A personalized domain name
• WebMail with a personalized email
• 24/7 supportive services from a team of qualified experts
• And more!
The exact services you get with managed WordPress hosting differs from provider to provider, but a good host will offer you access to these services as a part of their plan or as an additional addon service dependent on your specific needs.
The conclusion: Choose a hosting provider that offers managed WordPress hosting services.
What Hosting Provider Do We Recommend?
There are several different factors to consider when choosing a web host. Hosting companies offer a variety of plans with different features and limitations. These plans can range in price from around $10 to $100 and up per month depending on what hosting company you go with and which plan you choose. When looking for a host you must consider your individual needs. If you’ve been in business for a long time and already have a large online presence, you may want to consider looking for a more robust plan that offers the kind of hardware you need to handle such a feat. On the other hand, if you’re just starting out or you’re looking to expand your business online with a more scalable solution, we would recommend going for a plan that gives you the best bang for your buck while still offering comparable services. That’s why we recommend iPage.
What Does iPage Offer?
As a managed WordPress solution, iPage offers all of the services previously mentioned.
• Automated backups
• Automatic software updates
• Security (malware scanning and removal)
• Performance monitoring
• An easy-to-use hosting control panel
• One-click WordPress installation
• SSH access
• A personalized domain name
• WebMail with a personalized email
• 24/7 supportive services from a team of qualified experts
• And more!
They also allow you to host an unlimited amount of websites under your hosting plan and they provide you with an unlimited amount of storage and bandwidth. When signing up for a new plan with iPage you receive free domain registration for 1 year and every website hosted on iPage comes with a free SSL certificate.
The only catch is that iPage’s architecture for their shared hosting plans was built to support the vast majority their customers’ bandwidth demands; customers whose website’s traffic and data demands outgrow iPage’s architecture will need to upgrade their hosting plan to meet their needs. This means that when your business becomes a wild success you may need to upgrade to one of iPage’s scalable solutions, such as their Virtual Private Servers (VPS). Unless your website already requires truly robust bandwidth demands, then no need to worry until then. If your website grows to a point where it requires increased demands, iPage support staff will assist you in migrating your site to a server that can handle your needs. You can cross that bridge when you get there.
Until then, we recommend taking advantage of the savings while still receiving access to the same services featured on higher priced plans from other hosts. When it comes to hosting providers that have the most competitive introductory pricing, iPage takes the spotlight. Plans start at $1.99 per month when purchasing the Go Plan at a 36-month term, but our recommendation is to take advantage of iPage’s introductory special of $6.95 per month for the WP Essential package. This package comes with the necessary features to confidently build a WordPress website while providing site security with malware removal and 24/7 WordPress support. From there—as your website grows—you can scale it as-needed.
Upgraded services are offered through iPage’s dashboard thereafter such as increasing the frequency of website backups, additional security features, email marketing tools, search engine optimization services, and even adding a business phone line so you can separate your business contacts and communications from your personal ones through an app on your personal smartphone.
The iPage WordPress Essential package truly takes away a lot of the financial and technical doubt when starting a new business or expanding your business online.
The conclusion: Subscribe to the iPage “WP Essential” hosting plan to take advantage of their introductory pricing of $6.95 per month at the term of your choosing and scale your website as needed as it grows.
Step #3: Subscribe to iPage
If you decide to go with another hosting option, please skip to the following section. If you decide to go with iPage, please continue reading.
Start by clicking this link.
Once you’ve opened up a new tab and are on the iPage landing page, scroll over the Hosting option in the navigation bar and choose WordPress Hosting. Please refer to the animated image below for visual instructions. As we move forward, I will be including animated instructions to help you through the entire process step-by-step.
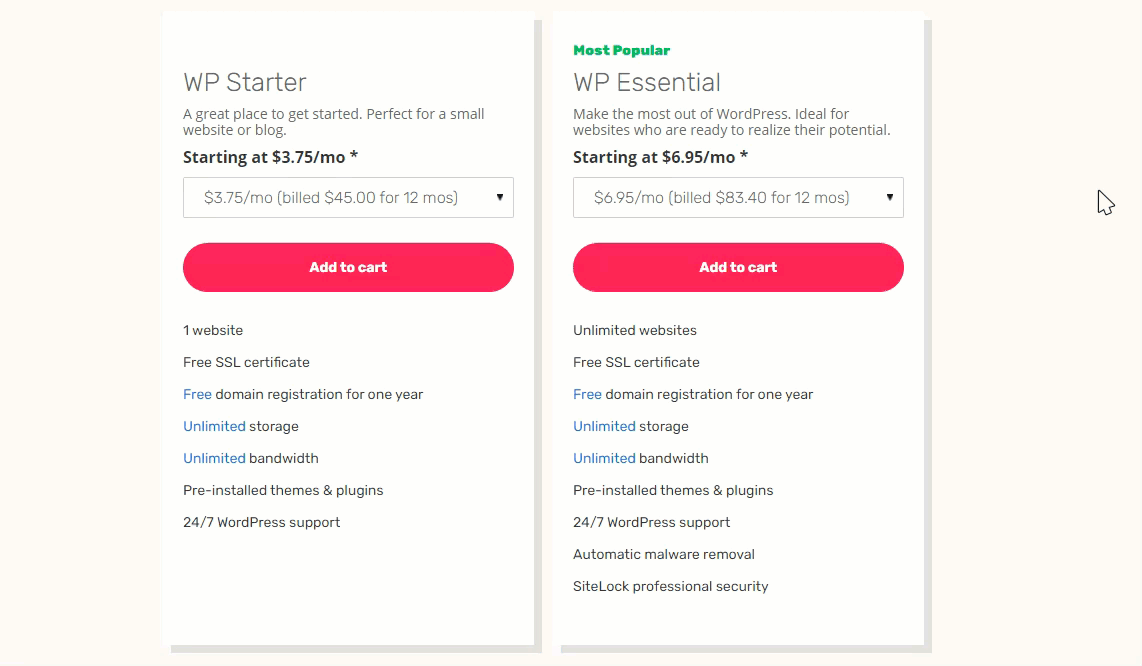
Once the WordPress Hosting page has loaded, scroll down until you see the two different plans that are offered: The WP Starter package and the WP Essential package. Once you see the two packages, select the term limit you would like to subscribe for under the WP Essential package click Add to cart. The term limits offered are for 12 months, 24 months, or 36 months. The 12 month subscription is the cheapest option at $83.40 billed annually, but the 36 month option will provide you with the most saving by granting you an extended amount of time on your introductory rate of $6.95 per month.
On the next screen you will be allowed to choose your domain name. With the iPage WP Essential package you will get the first year of your domain for free. To see if the domain name you want is available, type your desired website name into the search bar and click enter on your keyboard or click on the Search button with your mouse pointer.

If the domain you chose is available, it will automatically be added to your cart for $0.00 for the first year. Subsequent years will be billed at the normal rate.
On the right hand side of web browser you will notice that the WP Essential plan, the Free SSL Certificate, and the Domain Purchase have been added to your cart, you will notice that Privacy + Protection has been added to your cart as well. Privacy + Protection isn’t necessary and can be removed from your cart. When removing the Privacy + Protection feature, you will receive a popup that states “Your personal information will be listed in the public WHOIS database for anyone to see. Your domain name and website will not be scanned for malware or monitored for blacklisting.”
This is not true.
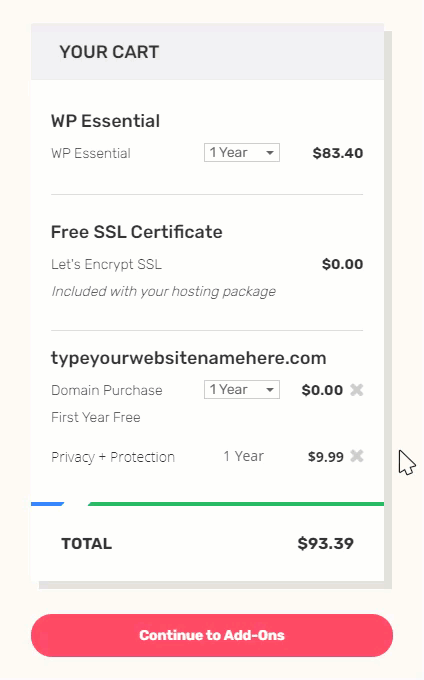
Although the Privacy + Protection feature does provide those services, so do the features provided in the WP Essential plan. Furthermore, there are ways to redact your information for privacy from the WHOIS registry without paying for this service. Once you have successfully removed Privacy + Protection from your cart, click Continue to Add-Ons. If you change your mind in the future and you wish to opt-in for this service, you can always do so later through your iPage client dashboard.

Once you’ve removed Privacy + Protection services and continued to the add-ons section you will notice that the Website Backup & Restore plan and Sitelock Essentials plan have been been added to your cart.
The WP Essential plan already has SiteLock professional security with automatic malware removal. Furthermore, iPage’s Advanced Tools section inside their Control Panel gives you access for up to two weeks of daily website backups and you can have them restored by reaching out to iPage support staff.
As for the add-ons, we suggest removing the upgraded packages being offered until you find yourself in need. The great part about iPage is that all of their features are scalable and you can pay for a more comprehensive hosting system as your needs grow.
At this point, you’re ready to Continue to Billing.
The next page is where you will need to fill out your billing & payment information. Once you’ve filled out both forms, click Buy Now.
Once you’ve purchased your plan, your account may be subject to a review before you are able to proceed. The iPage verification team may take up to 24 hours to review your order. Most of the time this process is pretty quick and usually takes no more than a few minutes. After your account has been verified you will receive an email with your login instructions.
Once you’ve received your iPage order confirmation & login info email, review the email and click the link that is provided for you to set your password.
Congratulations! You are the proud new owner of iPage’s WordPress web hosting services. In the next step we will get you acquainted with the iPage Control Panel, go over some of the key features of your plan, and get your WordPress website online.
Step #4: Getting Started
Domain Settings
When you first access the iPage Control Panel you will see the domain name you just registered on a list. With your plan, you can register an unlimited amount of websites and they will all show up on this list. Clicking on the domain name will take you to the Summary for that specific domain. Go ahead and click on your domain name if you haven’t already.
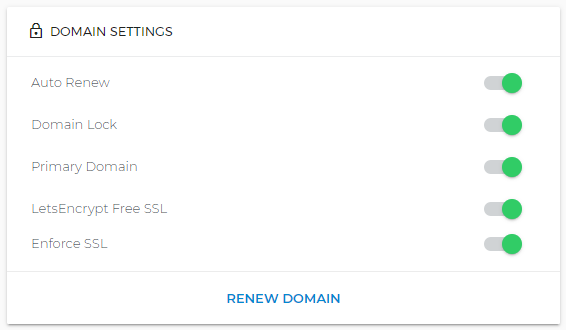
On your domain’s Summary page you will see a section called Domain Settings. Please make sure you enable all the settings. Auto Renew, Domain Lock, LetsEncrypt Free SSL, and Enforce SSL are all great security features that you definitely want to take advantage of.
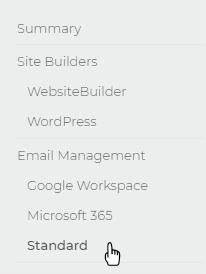
Email Management
If you want to create a personalized emailed address with your domain name attached to the end of it, you can do so for free. All you need to do is locate the Summary navigation menu on the left side of your browser and click on Standard under the Email Management section. Google Workspace and Microsoft 365 are paid email features iPage offers as an add-on service. Thje Standard email management feature is completely free and allows for unlimited mailboxes.
Once the Standard Email Management page has opened, go ahead and click the blue button next to Add Email and set your desired mailbox name and password.
The standard email management plan provides a choice between two different webmail clients; RoundCube and SquirrelMail. Personally, I prefer RoundCube, but you can try them both for yourself and choose the one that best suits you. You can always change which webmail client you want to use by visiting your Advanced Tools and clicking on the icon for Mail Tool Settings. There, you can switch back and forth from RoundCube to SquirrelMail to determine which website client you prefer.
Installing WordPress
To install WordPress on your domain, please head back to the Control Panel locate the navigation menu on the left side of your browser and click on WordPress under the Site Builders section.

After you click on WordPress your screen will reload and you will see a green button that says Get Started. This is the one-click WordPress installation feature that is offered by iPage. Go ahead and click on it.
You will now be presented with two different options; to use your existing or to purchase optimized hosting. We will using the WP Essential hosting plan that we just purchased. Go ahead and click on the blue Use Existing button.

On the next screen it is going to ask you for your Site Title. The site title will be displayed in the browser title bar when somebody is on your website.

You are allowed to use spaces and capitalization does matter and you can always change it later in your WordPress dashboard. Type in the title of your site and click continue.
On the next page you will need to enter your desired WordPress account information. This is important because this is the information that you are going to use to login and manage your WordPress website.
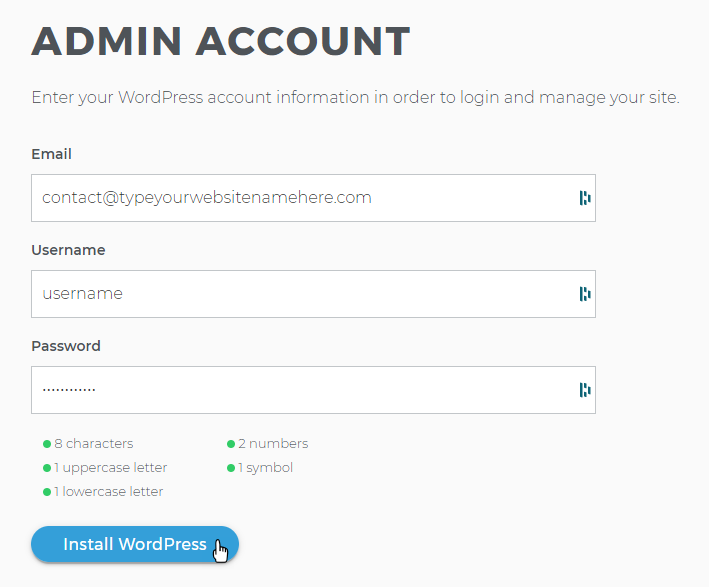
After you’ve filled in all of the information, click Install WordPress.
Congratulations! You’ve successfully installed WordPress on your new domain name. Now you’re ready to start building your website.
Once your WordPress installation has completed, you will be able to access your WordPress dashboard by clicking on Manage Site.

")


")